Friday, March 27, 2015

PP237: Your Perfect Day

Anyone else out there wait until the last minute to do something??  
This week's Paper Player's Challenge was posted here on Sunday.  I made a card on Monday but I just wasn't feeling it.  It needed something.  So I scratched the idea and decided last night around 9 that I would make a brand new card and submit it before noon today!  

Yes, I procrastinate!  

Nonetheless, the card is done and I like it more than I thought I would! :)

Here is the sketch for The Paper Players Challenge #237:


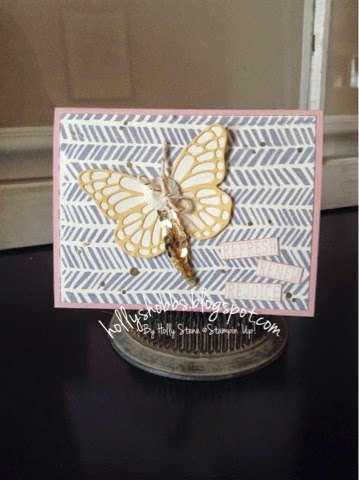
And here is the card I came up with:


The original card I made was the horizontal sketch, but when I started thinking about a vertical concept, the cake from Your Perfect Day came to mind.

I added a few flowers that punched out perfectly with the old itty bitty punches.  Much easier than fussy cutting :)


So there you go!  Better late than never.

Thanks for stopping by and have a wonderful weekend!

-Holly
Built for Free Using: My Stampin Blog

Tuesday, March 24, 2015

Ten Minute Tuesday - So Many Stars!

Today I'm going to share with you a fun & quick card!  I'm going to start something new on Tuesday with a card you can make in ten minutes or less!  This card might look like it took longer, but trust me, it only took a few minutes!  The kids were playing, my hubby was making dinner and I cranked out a new card.


Yes, literally cranked the big shot, cut 4 stars, embossed a layer and assembled.  Easy peasy!!


I added a few SAB items (the vellum pack and in-color accessories are both awesome!) and the card was complete.  

Thanks for swinging by! See ya next week for another quick ten minute (or less) Tuesday!!

Also, every Tuesday will feature the weekly deals in the right margin!

-Holly

Built for Free Using: My Stampin Blog

Saturday, March 21, 2015

Mother's Day Cards - Ready for orders!

Now don't go assuming I'm skipping Easter because I am posting Mother's Day cards.  I am most certainly not.  But I do know how overwhelmed I felt with Valentine's Day orders so I wanted a head start. :) 

Here are the two designs I've come up with:

The first one is a simple card to make.  I used framelits to cut out the MOM and stamped the front and inside with the Painted Petals stamp set.  Simple enough!


I just love these flowers! I hope this is a carryover set!


The second card I made features the flowers from the Indescribable Gift stamp set.  I believe there cherry blossoms.  To get the colored effect, I stamped the two splatter stamps from Gorgeous Grunge over the petals.


I then took my aqua painter and added soft suede ink.  I just flicked the tip of it to add the messy look to the front.  I hadn't tried this trick yet and was quite pleased.  I can't take credit - but I'm not sure either where I read this tip.  


I added ribbon and a button to the front and stamped the inside of the card too.


These cards were a lot of fun to make.  I hope that they bring a smile to whatever mom or "friend" may receive them.  

To all my friends who have lost their moms, I love you.  Keep smiling :)

And to my BFF waiting for an adoption, I pray this is your last Mother's Day alone! <3

Happy stamping! 

- Holly 


Built for Free Using: My Stampin Blog

Thursday, March 19, 2015

Kraft Grid Journal Birthday Book

Last August I made an Address Book using the kraft grid journals from Stampin' Up!  I was recently asked by a friend if I could make a birthday book for my etsy shop and here is what I came up with. :)


The kraft grid journal comes with 64 pages, so the first thing I did was tear the book into two books at the seam.  I don't think anyone needs 64 pages of birthdays!  I cut a piece of birthday bash DSP to cover the front and wrap around the spine a little.  I cut balloons using the balloon framelits and embossed the saying in crushed curry embossing powder.  (I ordered the Hooray It's Your Day set recently and it was perfect for this project.)
 I added the stars and twine to finish off the front.  


My husband suggested I make something to close the book better.  I was already on top of it, but I nodded in agreement to make him feel good. ;)
To make the fastener, I punched a large oval put of kraft cardstock and glued a calypso coral button on the back.  Worked like a charm!

There are two pages for each month.  I added accents of the same DSP & silver glimmer paper.  The months were stamped with the alphabet rotary stamp.  
Have I told you before how much I love this stamp?! 


This is going to be hard to give away.  Even if it IS for a profit.  

Guess I'll use the other half of the journal and make my own! :)

Thanks for stopping by! 

  
Built for Free Using: My Stampin Blog

Tuesday, March 17, 2015

Handcarved Butterfly Bundle


Today I want to share with you two Easter cards that I made yesterday.  I haven't used the Handcarved background stamp in a long time and thought I would break it out with some soft spring colors.

This first card features the medium sized butterfly framelit that you can purchase with the Butterfly Basics Bundle.


I added some gold touches with the sequin trim, gold twine and embossed spots.  I used my versamarker to draw some spots.  The cool thing about this is that you can color/emboss some and if you think it needs more you can add more if you want! 


For the second card I made, I stamped the flowers from the Butterfly Bundle set in memento ink.  This ink is the BEST because you can color right over the black and it will not smear.  So even those that never liked to stay in the lines and enjoy coloring!


A little gold glitz never hurt anyone :)


Thanks for stopping by!  I hope spring is well on its way to you!

Happy stamping :)

-Holly

Below are the items you would need to make these cards!  If you have any questions, please ask!


Built for Free Using: My Stampin Blog

Saturday, March 14, 2015

Pin It to Win It! - Welcome Spring Giveaway!


I'm so excited to bring you my first "Pin It to Win It" giveaway!  I have found that many of my pins are lost in la-la land and are not seen.  Even I have trouble finding them!  I would love to expand my Paper Joy followers, so I thought I would offer a monthly giveaway for my pinterest fans!  Don't worry, you still can enter if you don't have pinterest.  =)

Below is the image I would like you to pin (and feel free to share) :) 


Here's another option for flowers if a LOCAL winner is chosen.  I don't think they'll ship well.


Now all you have to do to collect entries is follow the giveaway below!

Thanks for joining in the fun!


a Rafflecopter giveaway

Thursday, March 12, 2015

OSAT-Blog-Hoppers-Spring-Flowers


Hello and welcome to our very first blog hop!  We're excited to have you join us!  We are a group of stamping friends from the Facebook group "One Stamp at a Time".  We wanted to bring you a monthly hop full of creativity with hopes to inspire you!  This is a talented group of ladies and gents, so feel free to follow along and learn something new!

If you're coming from James' site, thanks for continuing on to me!  
Talented guy, huh?  :) 

This month's theme is spring flowers.  Let's just say, I'm not feeling the spring here in Rhode Island.  This week has finally seen some days in the 50s, but there's still a ton of snow! 
Here is a picture from last Thursday - 7" of snow... 


I feel like it's going to take forever to melt!  I remember taking pictures of my boys at the barn last year for Easter.  I don't think it's going to happen this year... 

So as you can imagine, "thinking of spring flowers" might not be easy for me right now.  But Easter is around the corner and I'm still very excited!  Easter is my favorite holiday. I grew up in church (my dad is a pastor) and my love for Easter runs deep!  The old hymns on Easter morning that I can hear my dad singing, the smell of fresh flowers that filled the church, and ham dinner (yum!).  But most of all, I love the reason for the celebration! And a perfectly named stamp set - Indescribable Gift - is the set I'm featuring today.  


The colored flower is actually different than the background flowers - but only slightly.  If you noticed, I cut my flower up to fit closer together on the circle. To get this look, I stamped the image with whisper white ink and embossed it with white embossing powder.  I colored the flowers with my calypso coral blendabilities on the back side of the vellum.  (Now I know these are not available through Stampin' Up!  at this time, but I know that some of you have them and still use them.  There are other brands that are alcohol based that you can color on vellum.


I absolutely love the look stitching gives a card - a simple and easy detail that really makes a card special!   Here's an upclose shot at the stitch.  I also added a few dimensionals to the circle and the words Happy Easter.  


I also wanted to give you another option in case you don't have the markers and/or a sewing machine and you want a simple yet elegant card that showcases this set.  The card on the right was a quick and easy card!  It took less than five minutes to make!

I hope you enjoyed this post.  Check back every second Thursday of the month for our hop.
The lovely ladies following me are some very talented sisters!  Click on the next button and head on over to see what they have created for us today!  


Thanks again for stopping by & happy stamping!

-Holly


*Below is a full list of this month's participants. :)

Eva - http://evascardsandthings.evabussom.com/2015/03/osat-blog-hoppers-spring-flowers.html 
Elizabeth - http://craftsbyhappystamper.com/2015/03/12/spring-flowers-blog-hop/ 
Debbie - http://www.davdesigns.com/2015/03/osat-blog-hoppers-spring-flowers.html
Tina - http://tinascropshop.blogspot.com/2015/03/osat-spring-flowers-blog-hop.html
Megan - http://meganttstamps.blogspot.com/2015/03/osat-blog-hoppers-spring-flowers.html
James - http://stampinstud.blogspot.com/2015/03/osat-showers-bring-spring-flowersor.html
Holly - that's me :)
Darla and Nancy - http://stampinwithdarlaandsisters.blogspot.com/2015/03/osat-blog-hoppers-spring-flower.html
Andrea - http://onestampinmothertucker.blogspot.com/2015/03/osat-blog-hoppers-spring-flowers.html
Diane - http://stampandembellish.com/2015/03/osat-blog-hoppers-spring-flowers
Martie - http://martie-pollard.squarespace.com/welcome/2015/3/5/spring-flowers-osat-blog-hop
Justin - http://jkcardsonline.com/2015/03/osat-spring-flowers-blog-hop/


Wednesday, March 11, 2015

Stuffed French Toast

Good morning!  If you came here looking for some stamping inspiration, you won't find it in today's post.  But don't leave just yet!  Every once in awhile I like to blog about another love of mine other than stamping.  FOOD.  I've always loved being in the kitchen and cherish the days spent with my mom in her kitchen.  She definitely taught us girls how to bake.  Thanks mom! :)


So yesterday morning I made my family stuffed french toast.  Sunday night we celebrated my husband's birthday a day late.  My kidney stone still hadn't passed but I was able to atleast cook.  I decided around 4:30 to make homemade bread to go with the pot roast.  I tried a new recipe and when I went to program my bread machine, it said 4 hours! Everything was already mixed so we ended up passing on the bread with dinner.  

**Sometimes the yummiest breakfasts come from mistakes made while on painkillers.**

Which brings me to "mistake" number two.  Too much icing!  I made Shawn a red velvet cake with cream cheese icing, and you can see from the picture below how much leftover frosting I had!


The icing was a cream cheese frosting (butter, cream cheese, powdered sugar and vanilla). Perfect for stuffing french toast, no?  #sugarshock

Wisk 4 eggs and a cup of milk, dip the bread icing side up covering just one side of each slice and top with fruit.  I put mine on a press, but I'm sure flipping them on a griddle works too.  Keep warm in a 300 degree oven until ready. 


These raspberries were picked last September here in Rhode Island.  The boys preferred the raspberry but all three were pretty darn awesome!

Top with syrup, fruit and "sugar sugar" as my 2yo would say.  


Heck, I'd even dollop more icing on top :)


Thanks for stopping by.

Maybe I'll start a gofundme account to go to culinary school...

Just kidding!

:)

-Holly


Sunday, March 8, 2015

Stamping with the Boys


Today Shawn turned 32 and we had plans of having a nice day with our friends celebrating but unfortunately I woke up this morning with a kidney stone.  My card isn't made, cake isn't made and the pot roast will have to wait until later.  Shawn works Sunday mornings so I called my friend Jess and she came to the rescue.  She had to teach Sunday school but was wiling to come over to help with the boys this morning.  Shawn was able to get off work early too and was able to go to churc for the 2nd time in a year... 

So, I'm glad I planned ahead some.  Yesterday Eli and I sat down to make a card for his dad.  Eli and I haven't stamped together for awhile and he was really excited to play.  We picked out the rock background for the Adventure Bound DSP and the Dear Heart stamp set.  


He's a quick stamper :) 


Eli loves the big shot! 


Here's the finished card -- three blonde, blue eyed boys.  Eli did a fantastic job coloring!


Thanks for stopping by! If the post doesn't quite make sense, we can blame it on the painkillers! Hehe! 

Back to bed!


Thursday, March 5, 2015

Sale-a-Bration Spotlight - Best. Day. Ever

With just over three weeks left for Sale-A-Bration, I thought I would feature some cards I have made with each set.  These are fairly simple cards that I made using the Best Day Ever set and I feel anyone (even new to stamping) could do!  

The first one is this fun little card with a "splash" of color.  I don't make too many cards that aren't A2 size, but when I do, a simple 3x6 layout is a good second option.  The splatter is from Gorgeous Grunge - one of my favorite stamp sets (so versatile!) and the arrow is made with the What's Up punch.


For the next card, I used the hearts from the set paired with a sentiment from Perfect Pennants.  The DSP in the background is also a freebie from SAB called Best Year Ever.  This was a very quick and simple card.  This was one the ladies made at my card class the other night.  


This last card was fun to make!  I did ask some of my stamping friends which color combo to use.  I made both a blush blossom and coastal cabana "you" and I had a silver circle and calypso coral colored circle.  4 different combos - this is the viewers choice :)


I sure hope you enjoyed these cards and have some inspiration to use your Best Day Ever set.  If you don't have a set and you want it, feel free to ask how you can earn your set today! 

Happy Stamping :)
-Holly


Built for Free Using: My Stampin Blog